We keep the PH in the hatchery at a range of 6.8 – 7.0. Well water is fine.
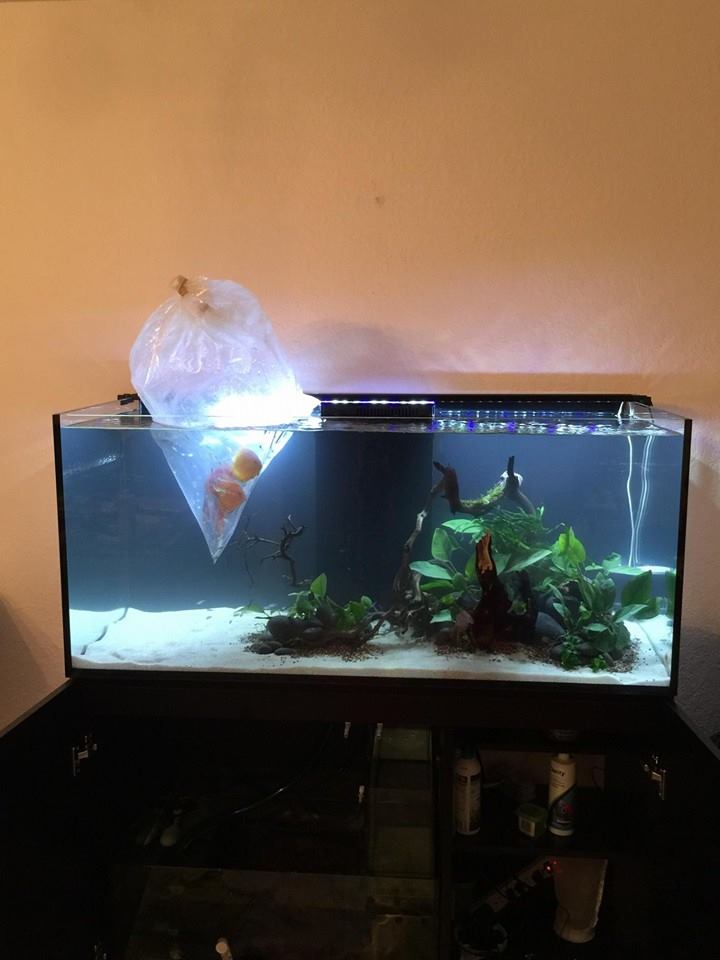
Take each bag and place them upright in a bucket. Cut off the tops of the bags and fold them back.
Take a cup of water out of the tank you are placing them in and pour a little in each one. Do this every 15 minutes for up to 1 hour.
Then, just empty as much water as possible and then let the fish slide into your tank.
Add the Stress Guard directly into your tank and follow the instructions.
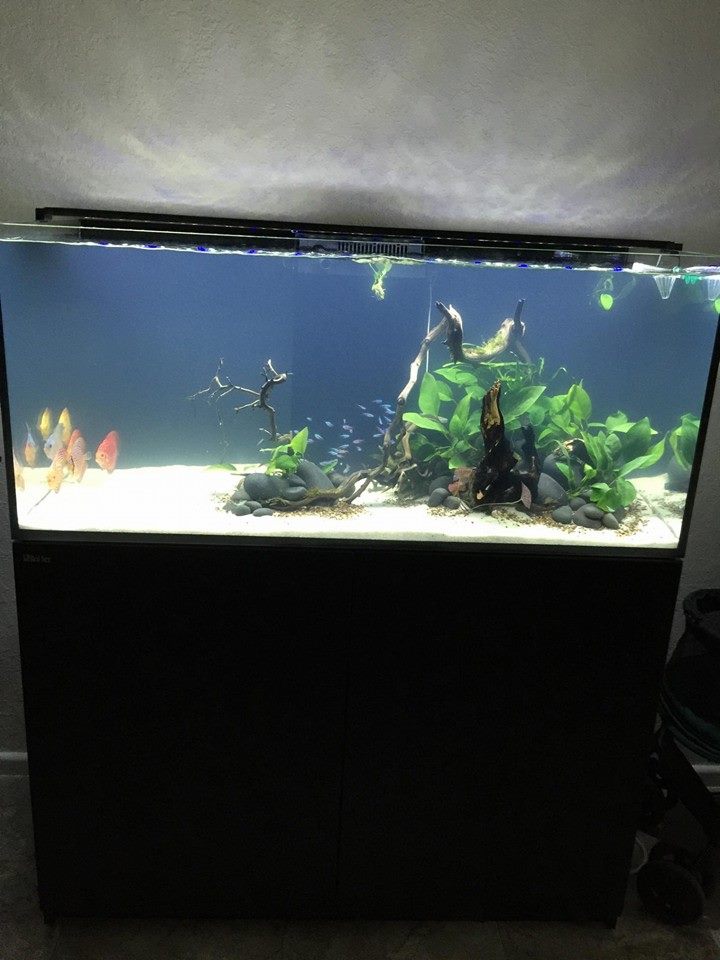
You should have the temp around 86-88 F degrees for the first month to stimulate their appetites and immune systems.
After the first month, bring the tank temperature down to 84 F. Enjoy the new additions to your collection.
Detailed instructions:
Now that you have received a box of carefully packed fish via FedEx, UPS, or retrieved from the airport, there are some important steps to follow which will ensure the fishes successful introduction into your tank(s).
Keeping the lights off on your tank during acclimation and for a couple hours post introduction of new fish will reduce stress. A fish just coming out of a shipped box will have been in total darkness anywhere from between 15-25 hours, so immediate exposure to bright lights can shock a fish as well.
Floating the unopened bag in an unlit tank for 10 minutes will ensure that the water temperature inside the bag is equal to that in your tank. You may then open the bag and add about 1/2 to 2/3 the volume of water shipping water with aquarium water of tank the fish are floating in.
For small and medium sized fish of approximately 1-3 inches length or for bags containing a few smaller fish (1-2.5 inches), you can hang the bag over the side of the tank now.
For larger sized fish of > 3.5-5 inches length or for bags containing multiple medium sized fish (approx. 3-4 inches), the results of hanging the bag over the side of the tank can cause severe oxygen depletion of the water inside the fish bag in a short time.
In this case, you may wish to try and catch air in the bag and re-tie the rubber band around the bag to imitate as best you can the appearance of the bag upon receipt. Laying the bag down horizontally will ensure that maximum surface area of water is exposed to air exchange at this time.
For most of the cichlids, catfish, barbs and tetras that I offer, after another 10 minutes, under normal circumstances, the fish are ready to be introduced into their new home.
I use methylene blue in standard shipping water of many fish. This will dye shipping water a light blue color. The methylene blue allows shipping water to hold a greater concentration of dissolved oxygen – which is exactly what the fish will need during prolonged transit inside a sealed bag.
It’s not advisable to add shipping water into your tank as it’s often visibly polluted with solid fish wastes and may be discolored from the breaking down of the wastes that occur while the fish is in transit. Either netting the fish from the bag or pouring the fish into a net placed over a bucket will allow you to avoid getting the shipping water in your aquarium.
While the newly added fish are transitioning to their new environment, you may take this opportunity to feed the current residents of the tank something they really enjoy to eat. While the home court fish are busy feeding, their attention is thus diverted from the new arrivals that are getting over their shipping stress and learning their way around their new home.
The method known as ‘drip acclimation’ can be more stressful than helpful for many fish and often inadequate to accomplish the act of water temperature equalization. While there are advantages to using this method on certain fish with proper precautions taken, the vast majority of fish I offer, coupled with the average packing density, do not favor using the drip method.
Reason #1 to not drip the fish: The tendency for this water to be cooled by ambient air temperature (the room temperature in your home) outside the heated aquarium will prevent temperature of water in bag (or bucket if you’ve transferred fish from shipping bag to other receptacle for acclimation) from reaching that of the tank by merely dripping aquarium water into bag.
Reason #2: Only a relatively small amount of water is used during transit. I generally ship fish using about 1/3 the volume of bag with water and 2/3 the volume of the bag containing pure oxygen pumped into bag upon packing. There is enough water to provide safe transit of the fish and keep water weight inside box at a reasonable level.
Once the bag is opened and the 100% oxygen is taken off the fish, the clock spins extremely fast towards oxygen depletion in that small amount of shipping water. As mentioned previously, this is used up most quickly by a large fish or by multiple fish in a small amount of water. If aeration is not provided by an air pump to the acclimating fish, the fish are in serious danger of oxygen starvation.
Reason #3: Drip acclimation can cause a reaction in the shipping water where the wastes produced by the fish while in transit may be fueled to reach toxic levels upon introduction of aquarium water.
In the event that a bag containing fish arrives deflated and severely lacking of water via puncture of bags by fish spines (a common occurrence when shipping larger cichlids and catfish), the fish may be introduced immediately to tank. It’s a much better solution to getting fish into a preferred environment versus an unfavorable environment such as that of a leaked-out bag.
Larger fish invariably take longer to transition to a new environment than smaller fish. Some species will proceed to lay down upon being released into new tank. Examples of this behavior may be witnessed upon receipt of many round-bodied South American cichlids such as oscars, chocolate cichlids, severum, festivum, Uaru, discus, angelfish, and frequently adult cichlids of varied origin.
This behavior is expected and seems to be the rule rather than the exception. Just try to ensure that these fish are not picked on by current aquarium inhabitants while they tend to come around in their own time. This may take anywhere from an hour or two to overnight. Please also keep the aquarium lights off as long as any fish are still in this transition state.
So while smaller/younger fish may begin feeding almost immediately post introduction to your tank, larger species may take a day or so before they are comfortable to resume feeding.
If you have any questions at all regarding immediate or long term care of the fish we have shipped you, please do not hesitate to call or email with questions.
Discus Quarantine Process – Scenario #1: Purchasing New Discus Fish
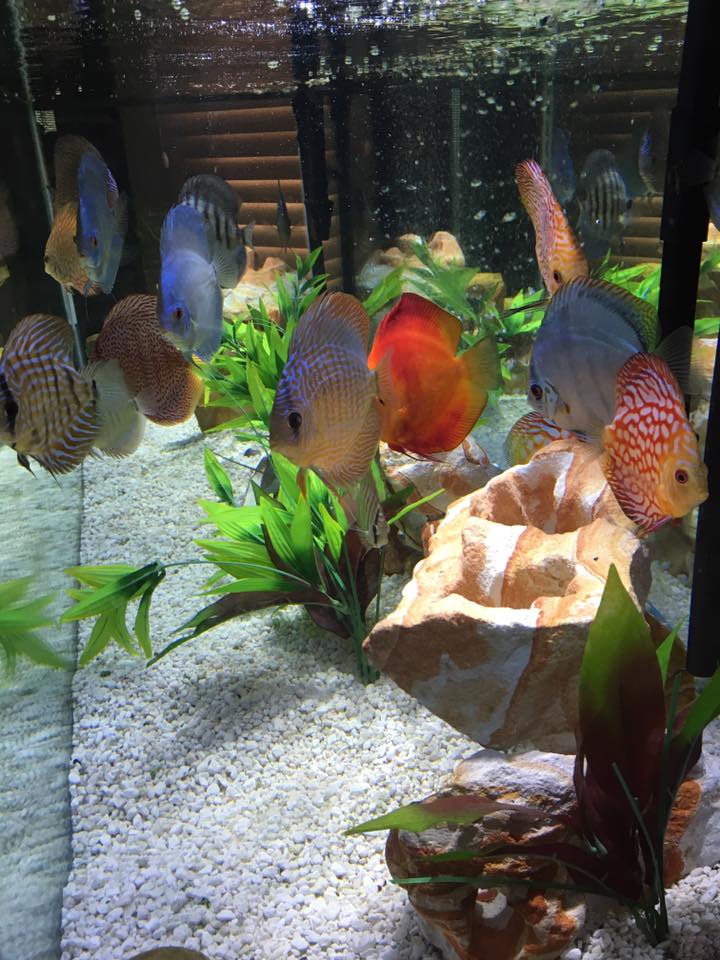
Whenever you get new discus fish you should quarantine them before putting them in your main discus tank. The purpose of this is to observe the new fish to ensure that their internal and external surface bacteria (microbiomes) are compatible with your aquarium and existing inhabitants. Allow me to use an example: an organ donor and recipient may both be perfectly healthy. However, the recipient may REJECT the organ due to incompatibility. You can have two perfectly healthy populations of fish that cannot coexist due to incompatible micro fauna on the surface as well as the intestinal tracts of the fish. I always quarantine new fish before adding them to my collection for 2-3 weeks to play it safe.
This quarantine process itself is fairly simple. You set up a small fish tank filling it up using water from your main aquarium. You will need to make sure that the quarantine tank has proper filtration and heat. You need to replicate your main tank as far as water temperature and water quality. When you new fish arrives acclimate them in the quarantine tank. It is highly recommended that you keep them in the quarantine tank for at least 3 weeks. Make sure that you keep the quarantine tank clean and perform regular water changes just like you do on your main tank. Keep close observation. Make sure they are eating and acting normal. After 3 weeks simply scoop them up in a net and place them in your main tank.
Discus Quarantine Process – Scenario #2: Treating Sick Fish
Another cause cause for a quarantine is usually an infection whether disease or bacteria on the discus fish. The exercise is usually carried out to prevent further spread to the other discus fish and hence prevent further damage. Therefore when carrying out the exercise, it’s important to understand and follow standard quarantine procedures. The reason we quarantine discus fish because they are living creatures. All living creatures have the ability to carry pathogens like bacteria or protozoan of one sort or another. Bacteria are frequently carried externally on discus.
When new discus fish are introduced into the same fish tank which already has other discus, the bacteria mixes and one or more of the discus may become sick as a result. Apart from that, when two independently healthy discus are mixed together, one may become sick in the process. Oftentimes discus will have a resistance to the bacteria they carry in small amounts and it may not make them sick unless they become stressed. At such a scenario, they may be overcome with the bacteria they carry.
It is recommended that when carrying out quarantine to first of all have their own tank, nets and hoses, filling devices, airlines, filters and buckets for a minimum time of 5 weeks. New discus should be kept in a separate room if possible from all your existing tanks. You have to remember even 1 drop of water from your old tank to the QT tank is cross contamination and vice versa. So it is very important to remember this when feeding and doing water changes. You should clean the quarantine tank either first or last and ensure you wash your hands and arms between the process of cleaning the quarantine tank and your other existing tanks.