I use a continuous drip system to perform water changes on my growout tanks. It’s a very cheap & simple system to install. It can get complicated depending on what you’re trying to accomplish. I’ll show my system with some suggestions to simplify it. I bought the filter equipment from Home Depot and the drip equipment from the Drip Store. I’ve seen a lot of the drip stuff at Home Depot as well as at hydroponics stores so you should be able to get it locally.
The premise of the system is that you run water directly from your water supply, through a couple of filters and then to your tanks, where a dripper only allows a small amount of water to enter the tank. An overflow box or hole in the tank moves the excess water to your drain.
I run the water to my system right off the water line. You can do this as I’ve shown here or just hook up a line to your faucet (use a Y adaptor so you can still use the faucet). I recently ran another hose off of my hot water line and connected it to the cold water hose. By using the valve on the hot water line I can mix hot & cold and get the water temp to about 70ºF so my heaters don’t have to work so hard. Having a good heater on a system like this is important as you’re dripping cold water into the tank. I only use Ebo Jager heaters on the tanks that I drip water into.

This system will only work if your tap water is suitable for fish. Mine has a pH of 7.5 and has chlorine but no chloramine. If it had chloramine I could not use this system as it would kill the fish. I got 2 filter canisters from Home Depot. I put a 1 micron particle filter in one (the white cotton-like filter) and a carbon block in the other. I use a 2 micron carbon filter and it should remove over 99% of the chlorine in the water. I replace these filters every 2 or 3 months. The carbon filter should be the last filter the flow of water hits. I’ve found that the best connector for the 2 canisters is a 2″ threaded brass pipe. You will also need pressure fittings for both sides of the filters, simple barb fittings won’t do, the pressure of the water will just shoot the hose off. After the carbon filter I have a pressure regulator from the Drip Store. It cost about $5 and drops the pressure down to 25psi so your dripper works properly. I’ve heard of people skipping this step and just turning the water on a bit but my water is plumbed right into my water line so I can’t & don’t want to do that. From the filter you can either run a 1/4″ hose direct to your tank (in a 1 tank situation) or run a 1/2″ hose to a group of tanks. I ran a 1/2″ hose up to the ceiling so it goes above all of my tanks.
This is a connection at the tank level. Since I am servicing multiple tanks I tie each tank into a 1/2″ hose running above all of the tanks. You just create a hole with a punch tool from the Drip Store, insert a barbed fitting, attach a 1/4″ hose and run it to a dripper that sits at the top of your tank. I insert a 1/4″ ball valve on all lines so I can easily turn off any tank on the system. I find that all of the barbed fittings that connect to the 1/2″ hose drip a bit so I make sure that the hose is above the tank so any drips fall in the tank. I also put silicone around the joint before running water, when I install the barbed fitting.
This is the end of the 1/2″ line and has an end cap on it. If you run a single 1/4″ hose to your tank the dripper will be the end of the line so you won’t need this piece or any pieces that have to do with the 1/2″ line. You can also insert a 1/4″ T fitting on the 1/4″ line to run the water to more tanks but if you are going to exceed 1 or 2 tanks I’d go with a 1/2″ hose as I’ve shown here.
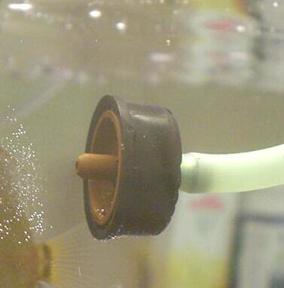
This is a 1/2gph dripper. I use these in most tanks and use green silicone hose to connect them as it’s easier to remove them. I usually run a T fitting and hook up 2 drippers per tank. You can also get the drippers in 1gph, 2gph & 3.3gph. Some stores sell variable output drippers that you can dial in the output. I have no experience with those. I have the hose cut so the dripper sits right in the water but if you don’t have covers on your tanks you could drip the water from above the tank level.
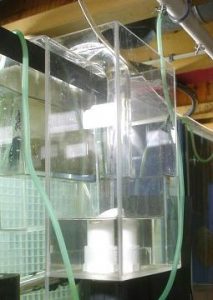
One of my tanks uses an overflow box that I purchased from Lifereef. It works very well but isn’t cheap. The output from this box just goes to my house drain.
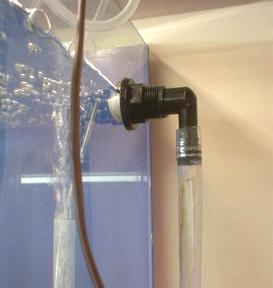
This tank is drilled and has a bulkhead fitting that I purchased from Jehmco. When you drill a tank you must drill a larger hole then the eventual hose that you want to connect. In this case I used a 1/2″ bulkhead fitting so the hole is 1 1/8″ in diameter. Again, the water from this hose goes to the house drain.